
Knowing where a checker can move is the first step. Choosing a move means comparing progress, safety and what your opponent can do next. Start with the position in front of you: are the two sides still able to hit each other, or has the game become a race?
This guide uses Ivory’s numbering, from point 24 toward point 1. It gives practical ideas and legal worked examples, not an expert rollout, a promised win rate or a rule that every position must follow. Learn the rules and board setup first if movement is new to you.
A useful checklist before every turn
- Check the bar. Re-enter hit checkers before moving anything else.
- Read the dice separately. Try both move orders when a route seems blocked.
- Look for a useful point you can make, or a hit you can safely cover.
- Check which single checkers your move leaves exposed.
- Use all playable dice, review the final board, then confirm.
Legal-move highlights show what is allowed; they do not rank the moves. In computer games, Practice hint suggests one legal step using simple position scoring. You remain responsible for the choice, and you can undo it before confirming.
Three opening moves worth understanding
Move notation writes the source first: 8/5 means move from point 8 to point 5. These three openings each use two checkers to make a point. They are useful examples to understand, rather than a complete chart for every roll or match score.
| Opening dice | Example turn | What it builds |
|---|---|---|
| 3–1 | 8/5, 6/5 | Two checkers protect your 5-point. |
| 4–2 | 8/4, 6/4 | A made 4-point in your home board. |
| 6–1 | 13/7, 8/7 | Your 7-point, just outside home. |
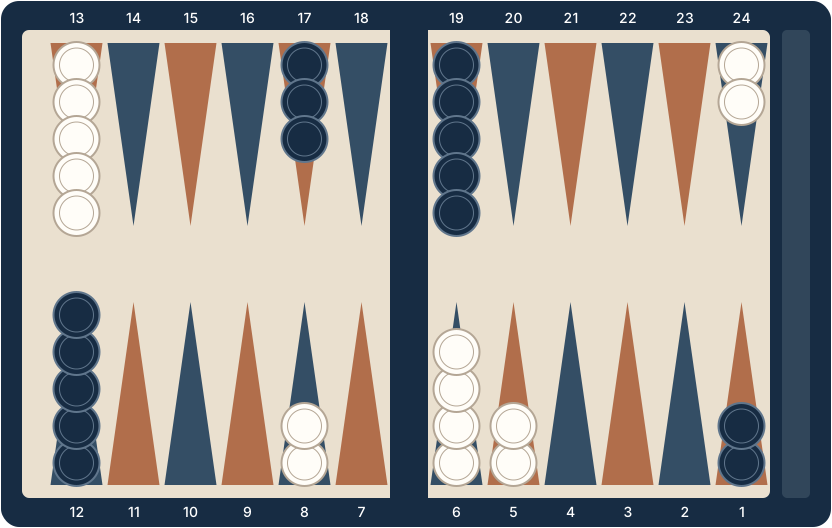
Try the 3–1 opening in the interactive practice lessons. The lesson checks the resulting position with the game’s rules engine.
Make useful points and build a prime
Two or more of your checkers on a point make it safe from a direct hit and close it to opposing checkers. A series of consecutive made points is a prime. A full six-point prime cannot be crossed while it remains intact, because no single die can jump over all six points.
Building a point can be more valuable than racing one checker forward. Think about which opposing checkers it blocks and whether your remaining checkers can support it. Piling spare checkers onto one already-made point may leave fewer builders available elsewhere. Do not split a useful point automatically just because one move travels farther.
When to hit a blot and when to cover
Hitting costs the opponent time: the checker goes to the bar and must re-enter through your home board. A stronger home board makes re-entry harder. A hit is not automatically the safest choice, though: your hitting checker may itself be left alone.
Before hitting, ask which opposing checkers could hit back, whether you can cover the landing point with the other die, and what useful point you would give up. In the practice position, 8/5 hits with a 3 and 6/5 covers with a 1. That is a specific hit-and-cover example, not advice to hit every blot you see.
Keep an anchor while you need contact
An anchor is a made point in your opponent’s home board. It gives your back checkers a safe place to stand and can keep a hitting chance alive when you are behind. Escaping every back checker is not always urgent if you still need contact to catch up.
A holding game keeps an anchor while waiting for a chance to hit or leave safely. A back game keeps multiple deep anchors and depends on timing and later contact. Keeping checkers back without a plan can lose a gammon; it is not a beginner shortcut. Balance an anchor’s safety against the cost of being trapped behind a growing prime.
Use the pip count to understand a race
A pip is one point of travel. Multiply each checker’s distance from bearing off by the number of checkers there, then add the results. An Ivory checker on the bar contributes 25; a borne-off checker contributes zero. Navy’s distances run in the opposite direction.
At the starting position, each side has 2 × 24 + 5 × 13 + 3 × 8 + 5 × 6 = 167 pips. The opening 3–1 uses four pips, reducing Ivory to 163. The game displays pip totals beside each player so you can compare them without counting every stack.
A lower pip count means less distance remains, but it is not a winning probability. In a pure race, distribution and wasted bear-off rolls still matter. While contact remains, hits, anchors and blocked entry points can outweigh a small lead. Do not use a pip lead alone as a cube calculator.
Bear off with the dice and your distribution in mind
Once every remaining checker is home, check whether you can remove checkers with both dice. An exact number bears off from its matching point; an oversized die removes from your highest occupied point. You still have to use the maximum number of playable dice, and the higher die when only one can be used and either would work.
For example, with one checker on 6 and one on 4, a 6–4 removes both. Using the 4 to move 6/2 first would miss that immediate finish. In a contact bear-off, also watch for a checker left alone where an opponent’s anchor could hit it. The fastest-looking removal is not always the safest plan.
Treat the doubling cube as a separate decision
The cube changes the game’s point value; it does not change the dice or make a losing position better. Taking accepts the new value and gives the taker control of future doubles. Dropping concedes the old value. Match score and the chance of a gammon change the decision, so there is no universal pip-count threshold for every game.
Start with a one-point game while learning checker movement, then try a three- or five-point match. Review the doubling and Crawford rules before offering a cube. This guide and the casual hints do not calculate expert cube equity.
Practise a decision, then review what happened
Use the six fixed practice positions to separate rules from tactics. In a full game, try a move, use Undo before confirming if needed, and compare the resulting points and blots. If you allow functional storage, your saved replays show the dice and moves after the game.
A replay is a record, not a performance grade. Ask one concrete question—such as whether a hit could have been covered—rather than treating every loss as proof of a bad move. A sound choice can still lose to the next roll.
Rules reference and the limits of these examples
The U.S. Backgammon Federation’s beginner guide is a rules reference. The worked moves on this page are checked for legality against our production engine. Strategic explanations are introductory reasoning, not engine-certified optimal moves; no expert author or competitive playing strength is claimed.
For stronger computer analysis, compare the documented options in our backgammon software guide. To apply the basics here, start a free computer game.